Affichage des articles dont le libellé est english. Afficher tous les articles

mercredi, septembre 16, 2015

Recipe for building a 10Mpps FreeBSD based router

First you need a server, with a minimum of 8 cores and a good NIC.
My setup is this one:

  • HP ProLiant DL360p Gen8: 8 cores Intel Xeon E5-2650 @ 2.60GHz
  • Quad port 10 Gigabit Chelsio TS540-CR


The first step is to entering the UEFI and disabling Hyper-Threading.
(note to myself: Need to generate benchmark comparing HT impact for a router use)

Once done, you can install a FreeBSD on it… but not a classical 10.2!

Default behavior of FreeBSD multi-queue NIC drivers is to create a number of queue equal to number of core (with a maximum number of 16 for Chelsio).
This mean for a 8 cores server, it will create 8 queues:
  • Each queue will obtain its own IRQ
  • The NIC will load-balance in/out frames between these queues
The NIC load-balance algorithm kepts same flow on the same queue by default: Then you need lot's of differents flow (different src/dst IP addresss or TCP/UDP ports) for a correct distribution among all theses queues: Don't bench your setup with only one FTP flow as example.

And FreeBSD meet a problem here because the number of queue/core didn't scale well after 4 cores:


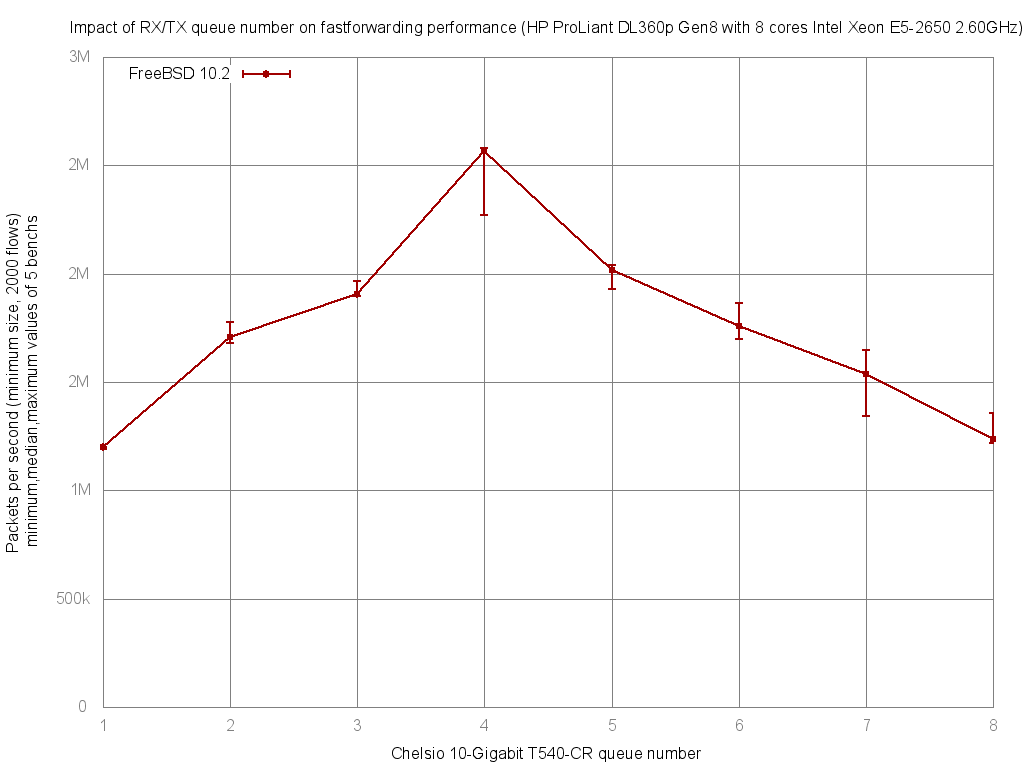
=> On this 8 cores setup, you need to reduce your NIC queue number to 4 for the best performance.

But recently this problem was resolved by Alexander V. Chernikov (melifaro) on its experimental projects/routing branchs (lot's of cleaning regarding fine locking and testing new ideas):


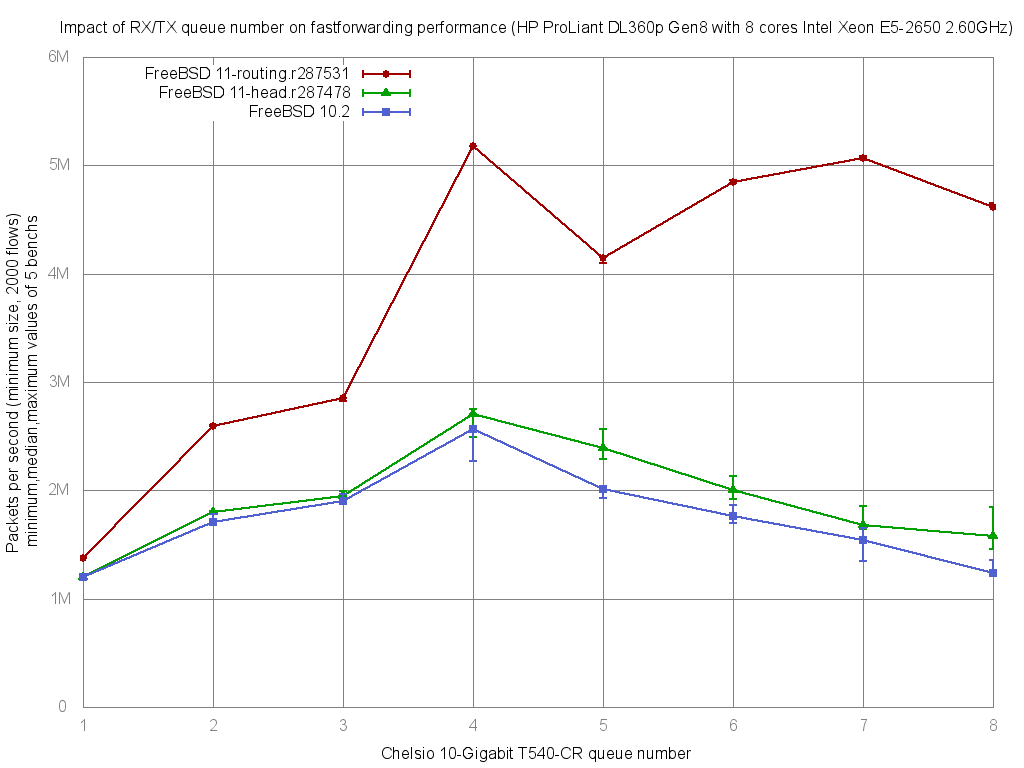
Well… almost resolved: We see a big improvement and perfect linear scale up to 4 cores but still not linear to 8 cores. 
And surprisingly this non-linear problem isn't related to the improvement in forwarding code, but to the new random entropy harvester brings recently in head that is collecting first 2 bytes of each frame under single mutex.
Disabling INTERRUPT and NET_ETHER entropy sources (by adding harvest_mask="351" in /etc/rc.conf) solve the problem:


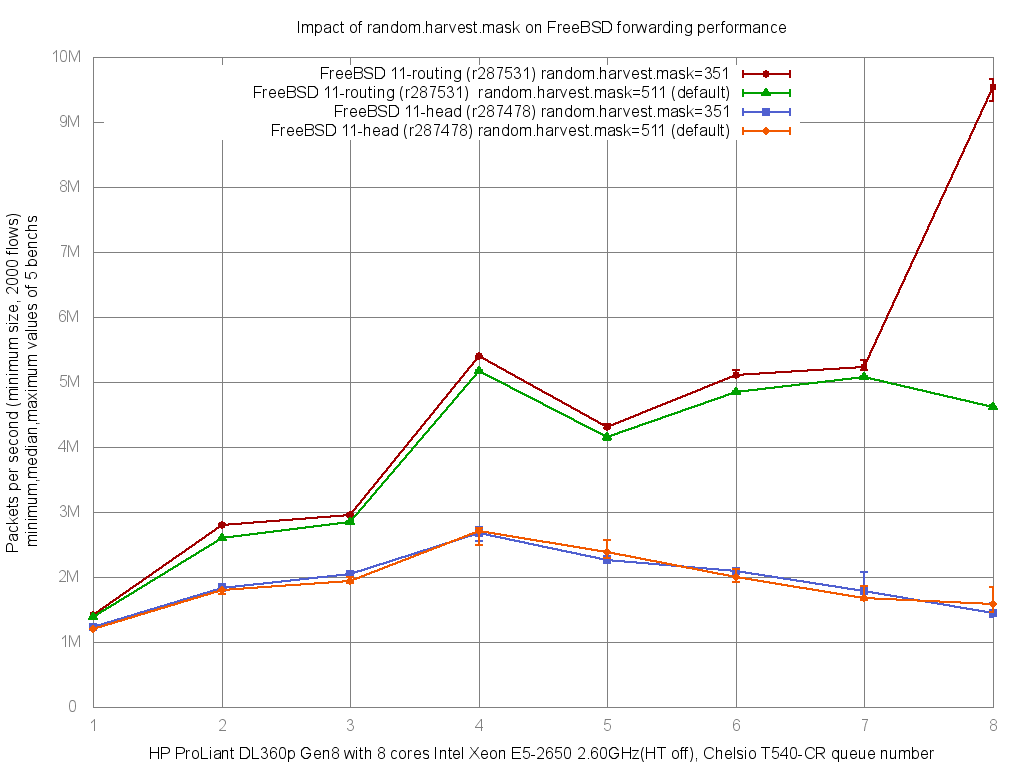
=> 9.5Mpps on this setup !

And for non-network people who didn't understand value in "paquet-per-second", here is a different graph regarding impact on forwarding performance with ipfw or pf enabled. With the equivalent IMIX on the right side:


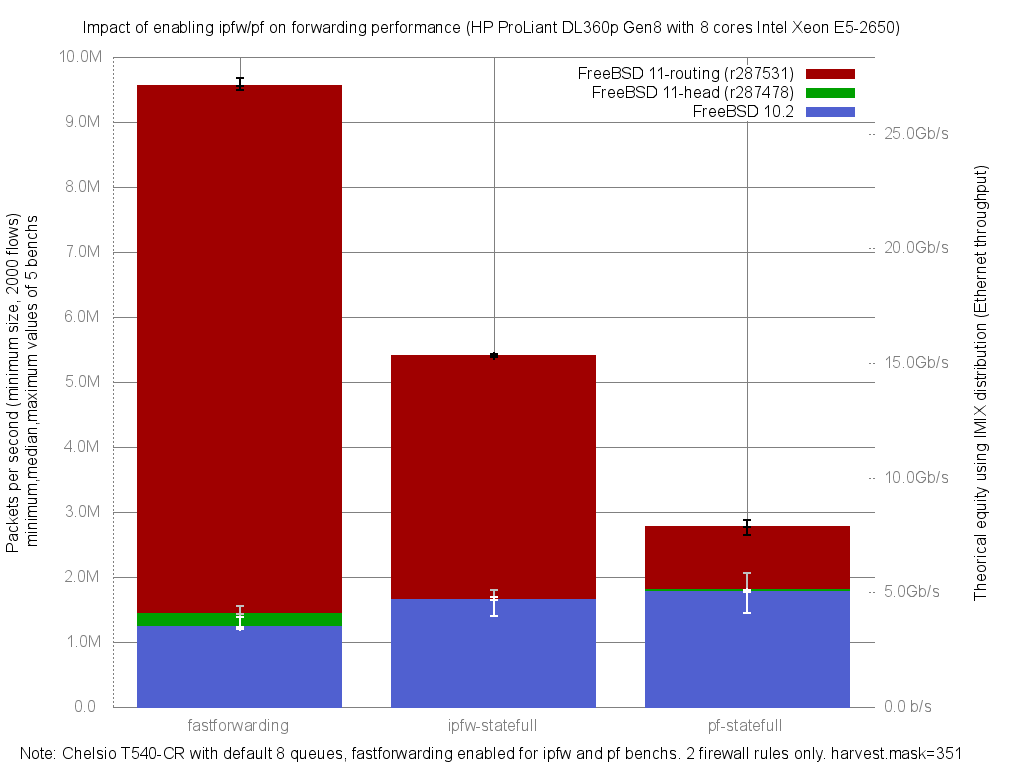
Now how to reach 10Mpps? Just use a little more powerful CPU ;-)

And if you want to test these new performance on your hardware you just need one USB flash disk and installing on it these BSD Router Project (nanobsd) EXPERIMENTAL images used for theses benchs. It's just a dd to the USB flash disk, and more installation instructions are on BSDRP web site.

mercredi, juin 24, 2015

Serial-PXE-TFTP install of FreeBSD(BSDRP,Xsense,NAS4Free)/OpenBSD/Centos

Objectives

Remote  installation of multiples Operating systems using only:
  • FreeBSD server with a PXE and TFTP services
  • Serial console: IPMI Serial-over-LAN (sol)

I didn't found an easy way for PXE+TFTP (only!) serial remote installation for NetBSD or DragonFly.
FreeBSD was very complex too (need to recompile bootloader for TFTP and serial usage), but hopefully mfsBSD hides this problem.
OpenBSD and CentOS, by providing ramdisk natively and easy way of configuring their bootloader, were the most admin-friendly.

dnsmasq

This step will install an all-in-once DHCP/TFTP server:
pkg install dnsmasq
Then, create a small configuration file (example with "bce1" as NIC and local subnet in 192.168.1.0/24)
cat > /usr/local/etc/dnsmasq.conf <<EOF
interface=bce1
dhcp-range=192.168.1.80,192.168.1.85
pxe-service=x86PC, "pxelinux", pxelinux
enable-tftp
tftp-root=/tftpboot
EOF


And start it:
sysrc dnsmasq_enable=yes
service dnsmasq start

pxelinux

This step will install pxelinux binaries and configure PXE menu:
mkdir /tftpboot
cd /tftpboot
fetch https://www.kernel.org/pub/linux/utils/boot/syslinux/syslinux-6.03.zip
unzip -d syslinux syslinux-6.03.zip
cp syslinux/bios/memdisk/memdisk /tftpboot
cp syslinux/bios/core/pxelinux.0 /tftpboot
cp syslinux/bios/com32/elflink/ldlinux/ldlinux.c32 /tftpboot
cp syslinux/bios/com32/menu/menu.c32 /tftpboot
cp syslinux/bios/com32/libutil/libutil.c32 /tftpboot
cp syslinux/bios/com32/modules/pxechn.c32 /tftpboot
cp syslinux/bios/com32/lib/libcom32.c32 /tftpboot

cp syslinux/bios/com32/chain/chain.c32 /tftpboot
cp syslinux/bios/com32/modules/reboot.c32 /tftpboot/
rm syslinux-6.03.zip
rm -rf syslinux
mkdir /tftpboot/pxelinux.cfg
cat > /tftpboot/pxelinux.cfg/default <<EOF

SERIAL 0 115200
CONSOLE 0
UI menu.c32
TIMEOUT 300
MENU TITLE PXE BOOT MENU
LABEL freebsd
 MENU DEFAULT
 MENU LABEL mfsbsd (FreeBSD, pfSense, BSDRP, NAS4Free, etc...)
 KERNEL memdisk
 APPEND initrd=/mfsbsd-10.1-RELEASE-amd64.img harddisk raw
LABEL openbsd
 MENU LABEL OpenBSD
 KERNEL pxechn.c32
 APPEND ::/openbsd/pxeboot
LABEL netbsd
 MENU LABEL NetBSD
 KERNEL pxechn.c32
 APPEND ::/netbsd/pxeboot_ia32_com0.bin
LABEL centos
 MENU LABEL Centos 7
 kernel centos/vmlinuz
 append initrd=centos/initrd.img method=http://mirror.centos.org/centos/7/os/x86_64/ devfs=nomount ip=dhcp console=ttyS0,115200 earlyprint=serial,ttyS0,115200
LABEL local
 MENU LABEL local disk
 KERNEL chain.c32
 APPEND hd0

LABEL reboot
 MENU LABEL reboot
 KERNEL reboot.c32
EOF

FreeBSD

Download mfsBSD image and enable serial port:
fetch -o /tftpboot/mfsbsd-10.1-RELEASE-amd64.img http://mfsbsd.vx.sk/files/images/10/amd64/mfsbsd-10.1-RELEASE-amd64.img
mdconfig -a -t vnode -f mfsbsd-10.1-RELEASE-amd64.img
mount /dev/md0a /mnt/
echo "-S115200 -h" > /mnt/boot.config

umount /mnt
mdconfig -d -u 0

OpenBSD

Download OpenBSD's pxeboot and RamDisk image, then enable serial port:
mkdir /tftpboot/openbsd/
fetch -o /tftpboot/openbsd/pxeboot http://ftp.openbsd.org/pub/OpenBSD/5.7/amd64/pxeboot
fetch -o /tftpboot/openbsd/bsd.rd http://ftp.openbsd.org/pub/OpenBSD/5.7/amd64/bsd.rd
mkdir /tftpboot/etc
cat > /tftpboot/etc/boot.conf <<EOF
stty com0 115200
set tty com0
boot tftp:/openbsd/bsd.rd
EOF

CentOS

Download CentOS kernel and RamDisk:
mkdir /tftpboot/centos
fetch -o /tftpboot/centos/initrd.img ftp://ftp.free.fr/mirrors/ftp.centos.org/7.1.1503/os/x86_64/images/pxeboot/initrd.img
fetch -o /tftpboot/centos/vmlinuz ftp://ftp.free.fr/mirrors/ftp.centos.org/7.1.1503/os/x86_64/images/pxeboot/vmlinuz

Installing BSDRP, pfSense, OPNsense, NAS4Free, or any nanoBSD

From mfsbsd, just dd their serial nanobsd/embedded image to the local hard drive.
For installing FreeBSD: just uses bsdinstall

Debugging PXE/TFTP process

From the server, start a tcpdump accepting only bootps and tftp packets:
tcpdump -ni bce1 -vv port bootps or port tftp

lundi, octobre 13, 2014

ipfw improvement on FreeBSD -current

Few days ago Alexander V. Chernikov posted on the FreeBSD -net mailing list an "HEADS UP: Merging projects/ipfw to HEAD" with lot's of promises:
  • Tables are now identified by names, not numbers. There can be up to 65k tables with up to 63-byte long names.
  • Tables are now set-aware (default off), so you can switch/move them atomically with rules.
  • More functionality is supported (swap, lock, limits, user-level lookup, batched add/del) by generic table code.
  • New table types are added (flow) so you can match multiple packet fields at once.
  • Ability to add different type of lookup algorithms for particular table type has been added.
  • New table algorithms are added (cidr:hash, iface:array, number:array and flow:hash) to make certain types of lookup more effective.
  • Table value are now capable of holding multiple data fields for different tablearg users
I'm not an expert of ipfw(8), but I would check the impact of this improved-ipfw on forwarding performance. By "performance" I mean how this code impact the throughput (in term of packet-per-second) of my FreeBSD firewall (I didn't bench all the parameters requiered by RFC3511).
Once the code was committed as r272840 on -head, I've generated a new nanobsd(8) image on my 10gigabit bench lab… and here are the results:


More than 100K pps of differences! Now I dream of an ipfw_sync equivalent to pf_sync(4).
And here are the ministat output for statistician extremists.
Regarding ipfw in stateless mode:


x 272685.ipfw-stateless
+ 273009.ipfw-stateless
+----------------------------------------------------------------------+
|x      x     x    x                                  + + +      +    +|
|   |______A__M___|                                                    |
|                                                     |___M__A_____|   |
+----------------------------------------------------------------------+
    N           Min           Max        Median           Avg        Stddev
x   5       1585928       1619817       1608891     1604564.2     12728.878
+   5       1683246       1712607       1690405     1695508.6      12250.89
Difference at 95.0% confidence
        90944.4 +/- 18219.1
        5.66786% +/- 1.13546%
        (Student's t, pooled s = 12492.2)

And regarding ipfw in statefull mode:


x 272685.ipfw-statefull
+ 273009.ipfw-statefull
+----------------------------------------------------------------------+
|xx    x   x    x                       ++   +    +                   +|
||_____A______|                                                        |
|                                    |_______M___A____________|        |
+----------------------------------------------------------------------+
    N           Min           Max        Median           Avg        Stddev
x   5       1390415       1433678       1407058     1408663.4     18451.472
+   5       1502719       1589778       1517320     1529871.8     35404.181
Difference at 95.0% confidence
        121208 +/- 41172.4
        8.6045% +/- 2.9228%
        (Student's t, pooled s = 28230.4)

mercredi, septembre 17, 2014

PuTTY and Solarized colors

I'm using the Solarized color palette on all my FreeBSD desktops, but at work I had to works from a MS Windows desktop :-(
Here are my PuTTY settings for a correct rendering of Solarized colors.

Softwares used

Installation steps

Installing PuTTY or MTPuTTY didn't need specials instruction.
If you're using KiTTY, the Solarized PuTTY.reg files need to be adapted by opening them into a text editor and replacing the line:
[HKEY_CURRENT_USER\Software\SimonTatham\PuTTY\Sessions\Solarized%20Dark]
By this one:
[HKEY_CURRENT_USER\Software\9bis.com\KiTTY\Sessions\Solarized%20Dark]
Then import the .reg files.

KiTTY/PuTTY configuration

Now start KiTTY or PuTTY, load the Dark or Light Solarized session and modify this session with:
  • Window - Colours : Enable "Allow terminal to use xterm 256-colour mode"
  • Connection - Data - Terminal details : Terminal-type string : "xterm-256color"
You can then add more customization, for example:
  • Terminal - Bell : Visual Bell
  • Window - Appearance - Font Settings - Font: "Consolas" - 12point
  • Window - Appearance - Font Settings - Font quality: ClearType
  • Window - Translation - Remote character set: UTF-8
  • Window - Lines of scrollback: 10000
  • Window - Selection - Control use of mouse: xterm (Right extends, Middle Past)
  • Connection : Second between keepalives: 25
  • Connection : Enable TCP keepalives
  • Connection - SSH - X11: Enable X11 forwarding
Once all your customization done, save the session as "Default Settings".

Checking parameters

Start a KiTTY/PuTTY, check that your preferences are loaded by default and open a SSH session to an *nix machine.
Once logged, the command "echo $TERM" should answer "xterm-256color".
And, if you've solarized your VIM (you don't need to use let g:solarized_termcolors=256!), you should correctly see the column after entering a "set colorcolumn=80".

tmux

tmux need to be configured for advertise a 256color term by adding in ~/.tmux.conf the line:
set -g default-terminal "screen-256color"

samedi, janvier 25, 2014

Ethernet-Wifi failover on FreeBSD

I want a simple behaviour with my laptop:
  1. If Ethernet cable connected use this connectivity, otherwise use the wireless;
  2. I want to kept the same IP addresses, event if I'm using DHCP client.
The solution is quiet simple:
  1. set-up an aggregate interface in failover mode with Ethernet as primary and wireless as backup;
  2. Clone the Wireless MAC NIC to the Ethernet (opposite is not always possible with wireless chipset restriction).
Here are how to do it:

# ifconfig -l
iwn0 bge0 lo0

=> My Ethernet NIC is "bge0" and wireless is "iwn0" here

# set MAC=`ifconfig wlan0 | grep ether | cut -d ' ' -f 2`
# sysrc ifconfig_bge0="ether $MAC"
ifconfig_bge0:  -> ether 00:1c:23:25:ab:45
# sysrc wlans_iwn0=wlan0
wlans_iwn0:  -> wlan0

# sysrc ifconfig_wlan0="WPA up"
ifconfig_wlan0: WPA DHCP -> WPA up
# sysrc cloned_interfaces=lagg0
cloned_interfaces:  -> lagg0
# sysrc ifconfig_lagg0="laggproto failover laggport bge0 laggport wlan0 DHCP"
ifconfig_lagg0:  -> laggproto failover laggport bge0 laggport wlan0 DHCP
# sysrc ifconfig_lagg0_ipv6="inet6 accept_rtadv"
ifconfig_lagg0_ipv6:  -> inet6 accept_rtadv

# service netif restart

And now with Ethernet cable unplugged:

# ifconfig lagg0
lagg0: flags=8843<UP,BROADCAST,RUNNING,SIMPLEX,MULTICAST> metric 0 mtu 1500
    ether 00:1c:23:25:ab:45
    inet6 fe80::41d:23ff:fe25:ab78%lagg0 prefixlen 64 scopeid 0x4
    inet6 2a01:e35:9b9d:a1a0:41d:23ff:fe25:ab45 prefixlen 64 autoconf
    inet 192.168.100.7 netmask 0xffffff00 broadcast 192.168.100.255
    nd6 options=23<PERFORMNUD,ACCEPT_RTADV,AUTO_LINKLOCAL>
    media: Ethernet autoselect
    status: active
    laggproto failover lagghash l2,l3,l4
    laggport: wlan0 flags=4<ACTIVE>
    laggport: bge0 flags=1<MASTER>


Then If I plug the Ethernet cable:


# ifconfig lagg0
lagg0: flags=8843<UP,BROADCAST,RUNNING,SIMPLEX,MULTICAST> metric 0 mtu 1500
    ether 00:1c:23:25:ab:45
    inet6 fe80::41d:23ff:fe25:ab45%lagg0 prefixlen 64 scopeid 0x4
    inet6 2a01:e35:9b9d:a1a0:41d:23ff:fe25:ab45 prefixlen 64 autoconf
    inet 192.168.100.7 netmask 0xffffff00 broadcast 192.168.100.255
    nd6 options=23<PERFORMNUD,ACCEPT_RTADV,AUTO_LINKLOCAL>
    media: Ethernet autoselect
    status: active
    laggproto failover lagghash l2,l3,l4
    laggport: wlan0 flags=0<>
    laggport: bge0 flags=5<MASTER,ACTIVE>


mercredi, juin 05, 2013

Generating custom FreeBSD installation media


Objective

Generating a custom -current memstick image without all the debug feature enabled.

Prerequisite

Have the head source installed (I will use /usr/src as example).
If not, here is an example for synchronizing up-to-date head (-current) sources on /usr/src
svnlite co svn://svn.freebsd.org/base/head /usr/src

Customizing build compilation options

A little debug feature to disable on -current:
echo "MALLOC_PRODUCTION=yes" > /etc/src.conf

Building world and kernel

New we start the classical building of world and our customized kernel.
For information this step takes about 4 hours on my PC.
cd /usr/src
make buildworld; make buildkernel KERNCONF=GENERIC-NODEBUG

Generating install media image

Last step: Generating the install media.
Here is an example for generating memstick install media without port tree (long live to pkgng! neither doc):
cd /usr/src/release
make -DNOPORTS -DNODOC memstick


Replace "memstick" by "cdrom" (bootonly.iso and release.iso) or "ftp" for other media.
You can add a -DNOSRC option for avoiding to include sources too on the media.

Then copy the image to your usb key:
dd if=memstick of=/dev/da0 bs=64k

Cleaning your mess

Your system has lot's of file that you don't need anymore, here is how to clean it:
cd /usr/src/release
make clean
cd /usr/src
make clean


mercredi, mars 06, 2013

Xorg for FreeBSD on Raspberry Pi

Thanks to Ray, we have a working X11 drivers that works on Raspberry pi too.
Here is how to install it:
Download the latest Daisuke's Raspberry pi FreeBSD image (login/password: pi/ raspberry and root password: raspberry).
Unzip, dd it on your 8GB SD card, boot your rspie and configure your network (Internet access mandatory for downloading pkg).
Install USB mouse drivers:
cd /usr/src/sys/modules/usb/ums
make clean all install

Install pkg and declare the repository:
fetch http://dev.bsdrp.net/pkg/freebsd:10:arm:32:el:oabi:softfp/Latest/pkg.txz
tar xf ./pkg.txz -s ",/.*/,,g" "*/pkg-static"
./pkg-static add ./pkg.txz

echo 'packagesite: http://dev.bsdrp.net/pkg/${ABI}' > /usr/local/etc/pkg.conf
Install Xorg, scfb drivers and some X apps:
pkg inst xorg-minimal xf86-video-scfb xorg-apps 
Configure /etc/X11/xorg.conf:
Section "Files"
EndSection 
Section "Module"
    Load        "dbe"
    Disable    "dri"
    Disable    "dri2"
    Disable    "glx"
    SubSection  "extmod"
       Option  "omit xfree86-dga"
    EndSubSection
EndSection


Section "ServerFlags"
    Option    "AIGLX"        "false"
    Option    "NoAccel"    "True"
    Option    "NoDRI"        "True"
    Option    "DRI"        "False"
    Option    "DRI2"        "False"
EndSection


Section "InputDevice"
    Identifier  "Keyboard1"
    Driver      "kbd"
EndSection


Section "InputDevice"
    Identifier  "Mouse1"
    Driver      "mouse"
    Option      "Protocol"      "auto"
    Option      "Device"        "/dev/sysmouse"
EndSection


Section "Monitor"
    Identifier  "Monitor"
EndSection


Section "Device"
    Identifier  "Generic FB"
    Driver      "scfb"
    Option    "NoAccel"    "True"
EndSection


Section "Screen"
    Identifier  "Screen"
    Device      "Generic FB"
    Monitor     "Monitor"
    DefaultDepth 16
    SubSection "Display"
       Depth           16
    EndSubsection
EndSection


Section "ServerLayout"
    Identifier  "layout"
    Screen      0 "Screen" 0 0
    InputDevice "Mouse1" "CorePointer"
    InputDevice "Keyboard1" "CoreKeyboard"
EndSection
Then a dummy ~/.xinitrc:
xterm &
xclock &
xcalc &
exec twm


And enjoy:
startx

A first ugly screenshoot:


jeudi, octobre 18, 2012

Using BCM4313 wireless chip under FreeBSD

I've got a new laptop at $DAY-JOB, and this laptop have a BCM4313 chip:

# pciconf -lv | grep Wireless
    device     = 'BCM4313 802.11b/g/n Wireless LAN Controller'

I've first try with net/bwn-firmware-kmod and if_bwn without success, but NDIS works great (on 9.1-RC2 at last).
Here here to proced for converting the Windows XP drivers to a kernel module:
# cd /tmp
# fetch  http://gugus69.free.fr/freebsd/Broadcom_BCM43xx_5.100.235.19_win5x.tgz
# tar xzvf Broadcom_BCM43xx_5.100.235.19_win5x.tgz
# cd Broadcom_BCM43xx_5.100.235.19_win5x/
# ndisgen

Inside ndisgen, here is to proceed:

  1. Type 3 for "Convert driver"
  2. INF Filename: bcmwl5.inf
  3. SYS Filename: bcmwl564.sys (or bcmwl5.sys for FreeBSD-i386)
  4. Firmware Files: kept empty

At the end, it should generated the bcmwl564_sys.ko module, now enable it:
# cp bcmwl564_sys.ko /boot/modules/
# kldload bcmwl564_sys

ndis0: mem 0xd4500000-0xd4503fff irq 19 at device 0.0 on pci36
ndis0: NDIS API version: 5.


And check that you have a new ndis0 interface:

# ifconfig | grep ndis
ndis0: flags=8843 metric 0 mtu 2290

You can now configure your rc.conf like that
kld_list='bcmwl564_sys'
wlans_ndis0="wlan0"
ifconfig_wlan0="WPA SYNCDHCP"


And enjoy !

dimanche, septembre 09, 2012

FreeBSD kernel for Nintendo Wii

Few months ago I've subsrcibed to the FreeBSD "svn-src-head" mailing-list for being notified of every change to the -current source tree.
And some weeks ago I've seen this message: Initial support for running FreeBSD on the Nintendo Wii.

What ??? FreeBSD is going running on Wii ???

I've looked for more information and found a small page that explain how to build it on the wiki: FreeBSD/Wii.
The commit message includes an important detail: "There are still some MMU problems and to get a working system you need to  patch locore32.S. Since we haven't found the best way yet to address that problem, we're not committing those changes yet."

  1. The -current code is incomplete, but meanwhile we can apply this locore32.S unofficial patch.
  2. The result is not usable: You will not obtain a shell prompt, it will hang before.
Here is the video of the boot process:


For building the kernel you need -current source tree, then the steps for building this kernel are pretty simple:

cd /usr/src
fetch http://gugus69.free.fr/freebsd/wii/locore32.diff
patch < locore32.diff
mkdir /tmp/WII
setenv MAKEOBJDIRPREFIX /tmp/WII ; make TARGET=powerpc TARGET_ARCH=powerpc buildworld
setenv MAKEOBJDIRPREFIX /tmp/WII ; make TARGET=powerpc TARGET_ARCH=powerpc KERNCONF=WII buildkernel

It will generate a kernel for WII here:
/tmp/WII/powerpc.powerpc/usr/src/sys/WII/kernel

Then follow instructions from FreeBSD/wii wiki page for setup the SD card.

You can download my own FreeBSD/Wii archive (to be extracted on the root of your SD card).

mercredi, août 22, 2012

My home NAS: HP ProLiant MicroServer

My old NAS system was dying, I need to found a new one…
Here is my new setup:
I've found lot's of advices regarding the setup of the HP MicroServer on TechForum.
Before installing FreeNAS on it, I'm playing with a small FreeBSD 9.0 installation on the USB key.
FreeBSD was installed without any package neither the port-tree: I'm using pkgng with my own package repository (thanks to poudriere).
The only problem that I found, was to correctly disable moused: A simple moused_enable="NO" in the /etc/rc.conf is not enough, I need to add moused_ums0_enable="NO" for disable it.
I've create 2 raid-z pools: A first with the internal hard-drives, a second with the external drives.

Now I've got lot's of disk space for my files:


[root@nas]/#zpool list
NAME       SIZE  ALLOC   FREE    CAP  DEDUP  HEALTH  ALTROOT
estorage  4,53T   912K  4,53T     0%  1.00x  ONLINE  -
storage   9,06T  6,56T  2,50T    72%  1.00x  ONLINE  -


lundi, mars 19, 2012

OpenBSD 5.1 installation on softraid(4)

OpenBSD 5.1 brings new cool features like this one:

"boot(8/amd64) is teached how to access softraid(4) volumes, which allows a kernel to be loaded from a softraid RAID 1 volume. Furthermore it is sufficient to only boot from a disk that is a member of a bootable softraid volume, as this case will be detected and the boot will automatically be redirected to sr[0-9]a:/bsd."

This mean that the bootloader can boot directly from a softraid(4) partition: No more "standard" partitions needed with kernel copied on them on both hard drive!


Here is how to proceed:
During your CD-ROM boot, check that you have a minimum of 2 hard drives detected:
CD-ROM: E0
Loading /5.1/AMD64/CDBOOT
probing: pc0 com0 mem[639K 126M a20=on]
disk: hd0+* hd1+* cd0
>> OpenBSD/amd64 CDBOOT 3.16
boot>

Continue the boot process and select to launch a shell:


Welcome to the OpenBSD/amd64 5.1 installation program.
(I)nstall, (U)pgrade or (S)hell? s

Display the names of the disks detected by OpenBSD:


# sysctl hw.disknames
hw.disknames=wd0:7922594e8158ee03,wd1:49129150e28daf19,cd0:,rd0:7c8ac10ea613493f

On this example (Virtualbox VM), we've got 2 SATA hard-drives: wd0 and wd1 (cd0 is the CD-ROM and rd0 is the RAM drive created by the kernel).
By default OpenBSD create only one /dev for the first hard drive, we need to create a second and initialize a MBR to them:

# cd /dev/
# sh MAKEDEV wd1
# fdisk -iy wd0
Writing MBR at offset 0.
# fdisk -iy wd1
Writing MBR at offset 0.

Now, we need to create a BSD label named "raid" to both disks.
We will create a BSD label for the first drive, and dump/restore the label table to the second drive:

# disklabel -E wd0
Label editor (enter '?' for help at any prompt)
> a a
offset: [64]
size: [20964761]
FS type: [4.2BSD] raid
> q
Write new label?: [y] 
# disklabel wd0 > protofile
# disklabel -R wd1 protofile


Now we can create a softraid(4) volume using the two "a" partitions :

# bioctl -c 1 -l wd0a,wd1a softraid0 
sd0 at scsibus1 targ 1 lun 0: SCSI2 0/direct fixed
sd0: 10236MB, 512 bytes/sector, 20964233 sectors
softraid0: SR RAID 1 volume attached as sd0

This will create a new drive: sd0 in this example.
Return back to the OpenBSD installer (Ctrl+D), and select this new softraid disk for the destination root disk:

# ^D
erase ^?, werase ^W, kill ^U, intr ^C, status ^T

Welcome to the OpenBSD/amd64 5.1 installation program.
(I)nstall, (U)pgrade or (S)hell? i

(etc...)

Available disks are: wd0 wd1 sd0.
Which one is the root disk? (or 'done') [wd0] sd0

Once installed, simply reboot and enjoy:


>> OpenBSD/amd64 BOOT 3.18
boot>
booting sr0a:/bsd: 5648376+1600524+932384+0+616448 [89+497880+322605]=0xd2d0a8
entry point at 0x1001e0 [7205c766, 34000004, 24448b12, ccb8a304]
(etc...)
sd0 at scsibus2 targ 1 lun 0: SCSI2 0/direct fixed
sd0: 10236MB, 512 bytes/sector, 20964233 sectors
root on sd0a (f7748118e1f577a4.a) swap on sd0b dump on sd0b
Automatic boot in progress: starting file system checks.
(etc...)


samedi, janvier 28, 2012

Installing Samsung ML-2950 series printer drivers on FreeBSD

I've just replaced my inkjet printer with a laser one (Samsung ML-2955ND: Netword and Duplex).
Samsung provide drivers for lot's of OS (HP-UX, IBM AIX, GNU/Linux, MacOSX, etc…) but nothing for FreeBSD :-(

Hopefully the GNU/Linux drivers is CUPS based and use standard PPD file… But with a binary only cups-filter.
I didn't know if it was possible to use the Linux emulation layer of FreeBSD for using this cups-filter, but a previous experience was successful, then I try it too.


The major idea is to:

  1. Install print/cups
  2. Enable and install the FreeBSD Linux binary compatibility
  3. Getting the Samsung Unified drivers for the ML-2950 series
  4. Extracting the PPD file and the i386 binary cups-filter used by the PPD
  5. Fixing the missing dependency needed by the samsung cups-filter

I will not explain the steps 1,2 and 3.

Extract the Unified Linux Drivers:
$ tar zxvf ULD_Linux_V1.00.06.tar.gz

Then check the filter used by the PPD file:

$ grep cupsFilter uld/noarch/share/ppd/Samsung_ML-2950_Series.ppd
*cupsFilter:  "application/vnd.cups-raster 0 rastertospl"

=> This PPD file use the "rastertospl" filter.


Now copy the PPD and the Samsung cups-filter to the local cups directories:
$ mkdir /usr/local/share/cups/model/samsung
$ cp uld/noarch/share/ppd/Samsung_ML-2950_Series.ppd/usr/local/share/cups/model/samsung/
$ cp uld/i386/rastertospl /usr/local/libexec/cups/filter/

Once copied, you can execute rastertosamsungspl from a CLI for displaying the missing Linux libs:

# /usr/local/libexec/cups/filter/rastertospl
/usr/local/libexec/cups/filter/rastertosamsungspl: error while loading shared libraries: libcups.so.2: cannot open shared object file: No such file or directory

There are two method here:

The first and easiest is simply to install print/linux-f10-cups-libs. It should install all dependency needed by the crappy Samsung binary filter (Thanks Patrick for this tips!)

The second, a lot's more complex, and that add lot's of file not managed by the FreeBSD package manager is to check for missing libs one by one: You need to install the missing libs, running a ldconfig and re-execute rastertosamsungspl for discovering that another libs is missing.
Here is the list of all libs that I've installed:
# cd /tmp
# fetch http://archives.fedoraproject.org/pub/archive/fedora/linux/releases/10/Everything/i386/os/Packages/cups-libs-1.3.9-2.fc10.i386.rpm
# fetch http://archives.fedoraproject.org/pub/archive/fedora/linux/releases/10/Everything/i386/os/Packages/gnutls-2.4.2-2.fc10.i386.rpm
# fetch http://archives.fedoraproject.org/pub/archive/fedora/linux/releases/10/Everything/i386/os/Packages/libtasn1-1.5-1.fc10.i386.rpm
# fetch http://archives.fedoraproject.org/pub/archive/fedora/linux/releases/10/Everything/i386/os/Packages/libgcrypt-1.4.3-2.fc10.i386.rpm
# fetch http://archives.fedoraproject.org/pub/archive/fedora/linux/releases/10/Everything/i386/os/Packages/libgpg-error-1.6-2.i386.rpm
# cd /compat/linux
# rpm2cpio /tmp/cups-libs-1.3.9-2.fc10.i386.rpm | tar -zxf -
# rpm2cpio /tmp/gnutls-2.4.2-2.fc10.i386.rpm | tar -zxf -
# rpm2cpio /tmp/libtasn1-1.5-1.fc10.i386.rpm | tar -zxf -
# rpm2cpio /tmp/libgcrypt-1.4.3-2.fc10.i386.rpm | tar -zxf -
# rpm2cpio /tmp/libgpg-error-1.6-2.i386.rpm | tar -zxf -
/compat/linux/sbin/ldconfig


Once all dependencies are installed, you should have this message when executing rastertosamsungspl:

# /usr/local/libexec/cups/filter/rastertosamsungspl 
INFO: Usage: rastertosamsungspl job-id user title copies options [file]
ERROR: Wrong number of arguments

Now you can add your printer from the CUPS admin panel and use it :-)

dimanche, août 28, 2011

Backporting Intel PRO/Wireless 6205a FreeBSD 9.0 modules to 8.2

My old professionnal Dell Latitude D630 laptop was replaced by a new Dell Latitude E5420… and this new one have a wireless chipset not supported on FreeBSD 8.2:

[root@laptop]~#dmesg | grep iwn
iwn0: <Intel(R) PRO/Wireless 6205a> mem 0xe5300000-0xe5301fff irq 17 at device 0.0 on pci2
0xe5300000-0xe5301fff irq 17 at device 0.0 on pci2
iwn0: MIMO 2T2R, MoW, address a0:88:b4:7d:40:9c
iwn0: [ITHREAD]
iwn0: 11a rates: 6Mbps 9Mbps 12Mbps 18Mbps 24Mbps 36Mbps 48Mbps 54Mbps
iwn0: 11b rates: 1Mbps 2Mbps 5.5Mbps 11Mbps
iwn0: 11g rates: 1Mbps 2Mbps 5.5Mbps 11Mbps 6Mbps 9Mbps 12Mbps 18Mbps 24Mbps 36Mbps 48Mbps 54Mbps
iwn6005fw: could not load firmware image, error 2
iwn0: iwn_read_firmware: could not load firmare image "iwn6005fw"
iwn0: iwn_init_locked: could not read firmware, error 22


But, this new chipset is supported on FreeBSD-current, then I've backported it to 8.2.
I had to do 3 small changes in if_iwn.c file : One function name to revert (pci_find_cap to pci_find_extcap), and remove 2 lines (use of ic_rxstream and ic_txstream).
You can install this drivers like this:

cd /tmp
fetch http://gugus69.free.fr/tools/FreeBSD-8.2-iwn-current.tgz
cd /
tar zxvf /tmp/FreeBSD-8.2-iwn-current.tgz
cd /usr/src
make buildkernel
make installkernel
reboot

I've tested Internet browsing and small files transfert with this drivers without problem.

lundi, août 23, 2010

Juniper EX-4200 internal PFE routing in stack

During a troubleshooting session on a 10-members Juniper EX-4200 stack, I discovered the use of "show virtual-chassis vc-path source-interface XX destination-interface YY".
This command display the internal path across the EX-4200 PFE chips.
I obtain a result different that the EX-4200 diagram displayed in the O'reilly book "JunOS enterprise Switching" regarding the "Uplink Module".
Here are my results (simplified to a 3-members stack):


The Juniper use an internal routing-protocol for using shortest path between ports (less PFE hop count).
This diagram depends of how you build your stack too: If you use another way for plug your stack-cables, the result will be different.

Here is how to display the path when going from port ge-0/0/0 to ge-2/0/0

user@ex-stack> show virtual-chassis vc-path source-interface ge-0/0/0 destination-interface ge-2/0/0
vc-path from ge-0/0/0 to ge-2/0/0
Hop   Member  PFE-Device  Interface
0       0         1       ge-0/0/0
1       1         4       vcp-1
2       1         5       internal-1/25
3       1         3       internal-2/24
4       2         6       vcp-0
5       2         8       internal-0/24
6       2         7       ge-2/0/0

This means that if only one of the 3 PFE on one of your stack member have a problem, it's all flow that cross this member that will have problem.
You can check internal-PFE communication error with this command:
show virtual-chassis vc-port statistics extensive | match errors

jeudi, août 12, 2010

TCP flow analysis with tshark, tcptrace and xplot

Troubleshooting bad TCP performance between old Windows 2003 SP1 servers and a Sun Solaris 8, my only goal was to generate some TCP flow graph with Wireshark :
  1. The TCP Stream Graph: Time sequence grap


  2. The flow graph: TCP flow


But my old desktop computer was not able to opening the 1Go cap file onto Wireshark.
I found another solution using tshark, tcptrace and xplot:
  1. tshark, used with a little shell script, is used for extracting the TCP stream
  2. tcptrace is used for generate all graph files in xplot format (throughput, rtt sample time sequence , owin, segsize)
  3. xplot is used for drawing the graph using the xplot file generated in step 2
Here the shell script used for extracting the TCP stream:

#!/bin/sh
set -e
if [ $# -eq 0 ]; then
        echo "usage:"
        echo '$0 tracefile.cap ["tshark filter"]'
        echo ""
        echo "Example:"
        echo '$0 trace.cap "ip.addr==192.168.10.10 && tcp.port==1290 && ip.addr==192.168.20.20 && tcp.port==20'
        exit 0
fi
if [ ! -f $1 ]; then
    echo "No input trace file found!"
    exit 1
fi
echo "Generating the lists of detected TCP stream (can take a very long time depending of your trace size)..."
echo "If the next table didn't give you enough detail, try to generate more details stats with tshark:"
echo "tshark -n -r $1 -q -z conv,tcp"
echo "Stream    IP src TCP port scr IP dst TCP port dst"

if [ $# -eq 2 ]; then
    tshark -n -r $1 -R "$2" -T fields -e tcp.stream -e ip.src -e tcp.srcport -e ip.dst -e tcp.dstport | sort -un
else
    tshark -n -r $1 -T fields -e tcp.stream -e ip.src -e tcp.srcport -e ip.dst -e tcp.dstport | sort -un
fi

echo "Enter the stream number you want to extract (enter all for all streams):"
read streamid <&1
if [ $streamid != "all" ]; then
    echo "Extracting stream ${streamid} …"
    tshark -r $1 -w stream-${streamid}.cap -R "tcp.stream eq ${streamid}"
    echo "Stream number ${streamid} extracted in file stream-${streamid}.cap"
else
    echo "Extracting All streams"
    for streamid in `tshark -n -r $1 -T fields -e tcp.stream | sort -un`
    do
        echo "Working on stream ${streamid} …"
        tshark -r $1 -w stream-${streamid}.cap -R "tcp.stream eq ${streamid}"
    done
    echo "All streams were extracted in files stream-STREAM-NUMBER.cap"
fi


This script should be run like that:

[[olivier@sparc64]~/>sh extract-stream.sh solaris-slow-TCP.cap
Generating the lists of detected TCP stream (can take a very long time depending of your trace size)...
If the next table didn't give you enough detail, try to generate more details stats with tshark:
tshark -n -r solaris-slow-TCP.cap -q -z conv,tcp
Stream    IP src TCP port scr IP dst TCP port dst
0       10.10.129.254   48001   10.10.142.220   31114
1       10.10.129.254   1004    10.10.142.220   513
2       10.10.142.242   2948    10.10.142.220   1521
3       10.10.142.242   3899    10.10.142.220   1521
4       10.10.142.244   3777    10.10.142.220   1521
5       10.10.142.244   3536    10.10.142.220   1521
6       10.10.142.243   3687    10.10.142.220   1521
7       10.10.142.244   4936    10.10.142.220   1521
8       10.10.142.220   1521    10.10.142.244   3569
9       10.10.142.244   1256    10.10.142.220   21
10      10.10.142.220   20      10.10.142.244   1290
11      10.10.142.158   1433    10.10.142.160   1652
12      10.10.142.245   1591    10.10.142.220   1521
13      10.10.142.158   1433    10.10.142.160   1678
14      10.10.142.244   3732    10.10.142.220   1521
15      10.10.142.158   1433    10.10.142.160   1555
16      10.10.142.158   1433    10.10.142.160   1683
17      10.10.142.158   1433    10.10.142.160   1684
        10.10.142.247           10.10.142.255
Enter the stream number you want to extract (enter all for all streams):
10
Extracting stream 10 …
Stream number 10 extracted in file stream-10.cap


Once you've get the filtered cap file, run tcptrace over it:

tcptrace -n -C -G stream-10.cap

Now, better than with Wireshark (because you can zoom in/out), here are the TCP Time sequence grap:
xplot a2b_tsg.xpl &


 And the TCP flow graph:

 xplot a_b_tline.xpl &


My problem is that packet are lost in the direction Solaris => Windows… I need to found where now :-)